Telex-Vega IP-224 Interface
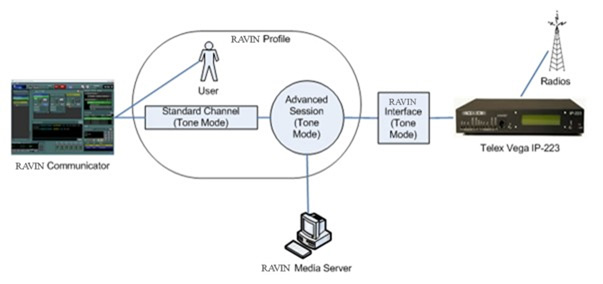
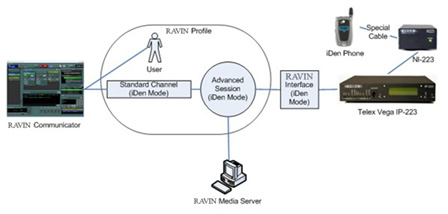
The logical diagrams below show the relationships between the various RAVIN components involved in bringing radio or iDen phone traffic through a Telex Vega IP-224 interface and onto a RAVIN Channel so that RAVIN Communicator users can participate. The IP-224 has two channels, which may be independently configured for either radio (tone) or iDen phone mode operation.

The first diagram shows how radios are connected to RAVIN using the IP-224. A RAVIN Interface is configured to connect to one channel of the IP-224 operating in tone mode. The RAVIN Interface and Advanced Session are hosted on a Standard type RAVIN Gateway. The Advanced Session associates the Interface with its hosting Gateway, and the Session also links a Standard Channel with the Interface. The RAVIN User Profile is a permission instrument that enables the User to access traffic on the Standard Channel and Advanced Session. When a User logs into a RAVIN Communicator using this Profile, the Standard Channel appears on the screen and permits interaction with radio users.

The second diagram shows how the iDen (Nextel) phone traffic enters the RAVIN system via a dedicated iDen phone handset hard wired to the NI-224 module using a special cable. The NI-224 is connected to the IP-224. The RAVIN Interface is configured to connect to an IP-224 channel operating in iDen mode. The RAVIN Interface, Advanced Session, Standard Channel, Gateway, and Profile used for iDen traffic have the same relationships as for tone radio traffic. iDen phone users can call (or push-to-talk) using the special number of the attached phone and thus communicate directly with the RAVIN Channel dedicated to iDen traffic.
Setting up the Telex Vega IP-224 / NI-224 interface
1. Setup the IP-224 unit and test with your radios. If you plan to use the IP-224 to bring iDen phone traffic into RAVIN, setup the NI-224 and connect it to the iDen phone using the correct cable.
2. Create a separate Interface for each IP-224 channel (iDen phone or radio), beginning with the Add Interface screen and continuing on to the Interface Form.
3. Create a separate Standard Channel for each IP-224 channel that you plan to work with.
4. Create the Advanced Session, and associate the Interface, the Standard Channel, and a standard type RAVIN Gateway with it.
5. Create or select existing User accounts and a User Profile, , and associate the Users, Standard Channel, and Advanced Session with the Profile.
6. Test the system by communicating between the RAVIN Communicator and the radios or phones.
Important: When using an IP-224 and NI-224 to bring iDen phone traffic into your RAVIN system, the iDen phone connected to the NI-224 must be powered up, connected to the iDen service, and open. If this phone is closed, powered off, or unable to connect to the service provider, iDen traffic from outside callers will not reach your RAVIN system.
Note: The iDen and radio traffic are routed to separate Interfaces, Channels, and Sessions within the RAVIN system. If you need to bridge between the two types of traffic, this can be done either as a Remote Patch (hosted on the Gateway) or as a Local Patch in the RAVIN Dispatch Communicator.
For more information about configuring and operating the Telex Vega IP-224, please refer to the Model IP-224 Ethernet Remote Panel Technical Manual, available from Telex.
For more information about configuring and operating the Telex Vega NI-224, please call us at (212) 755-5995 or email us at sales@gattcom.com
